Making your own digital embellishments, although sometimes time consuming, is very satisfying. Digital embellishments can be made to suit your layout perfectly - I sometimes use part of my photo to make the embellishment. Once you've made the embellishment, you can save it for future use - an inexpensive way to build up your artwork.
For this tutorial I have used Panstoria Artisan 4 to show you how to make a flower embellishment. If you use Creative Memories Storybook Creator (particularly version 4), the steps involved are almost identical and will be easy to follow. If you use other programmes such as Photoshop or Photoshop Elements, the steps will not be identical but the tool icons are similar, you may just need to experiment a little to find the perfect tools for the job.
Step1 : What embellishment to create
You can copy part of your photo to use as an embellishment but for the purposes of this tutorial I have downloaded an image from the internet.

The reason I chose this image is because there is a strong contrast between the flower and the background; the bigger the contrast, the easier it is to isolate the flower for your embellishment.
Step 2: Removing the Background
To remove the background you need to click on the image and use the "Cut & Fill" tool.

Here you can see that I've used the "custom" tool to roughly outline the flower. The flower is now shaded and I have clicked on "keep the shaded section". Once I click on "Cut", this is what I end up with:

As you can see, the flower is still messy and needs to be cleaned up.
Step 3: Cleaning Up Your Image
You still use the "Cut & Fill" tool to clean up your image but you need to be more accurate to define it better. To do this, I have used the "Magic Wand" tool.

You will need to experiment with this tool to get your threshold correct. In the above image, I have used a fairly low threshold of 20. The red circle on the image shows how much of the background will be cut away. It's not very much and it will take a long time to complete the task. Because the contrast between the flower and the background is strong, you can set the threshold much higher. Here's what happened when I set the threshold at 70:

The cut-away area is now much bigger and the task will be easier and quicker. Keep repeating the process around the flower until most of the background is gone, then you just need to refine your image.
Step 4: Refining Your Image
Once you have done Step 3, you may end up with an image that looks like this:

It's starting to look better but it's still a bit messy. At this point, you will need to enlarge your image significantly to make sure you get all the little messy left over bits.

You can use the "Custom" cutting tool or the "Magic Wand" tool to get rid of the remaining bits, depending what is easier for your situation. I used a combination of both to come up with this:

The flower looks quite nice but can be enhanced to make it even nicer.
Step 5: Enhancing Your Embellishment
I've used "Format" "Filters" "3D Edge" to give a more dimension to my flower.
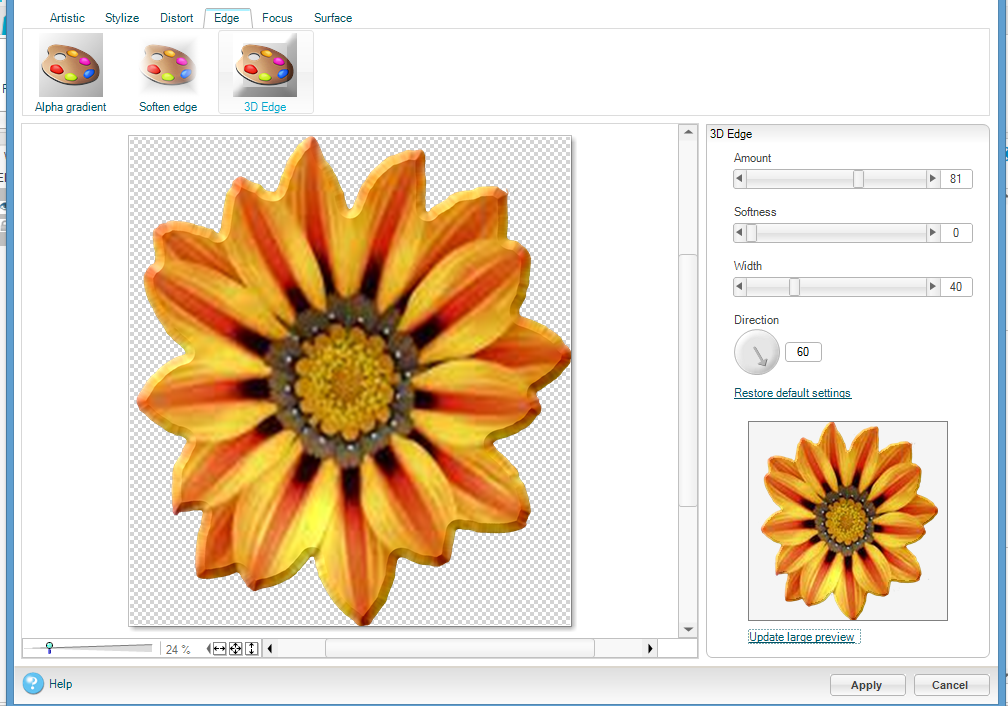
You can experiment until you get the exact size and direction you want for your 3D edge.
Finally, I added a shadow to make it look more realistic.

Step 6: Save Your Embellishment
Once you have completed your embellishment you can save it. In Artisan you can save it by right clicking on the image and in the drop down list select "Save Selection" and choose either "Export the image to a file" or "Save in personal art kits".
Thanks for looking and I hope you enjoy making your own embellishments. Just remember - the more you do it, the easier it gets and it's so satisfying.
Cheers
Wendy
No comments :
Post a Comment
Your comment will appear after approval. No anonymous comments will be accepted.